TheSky can drive many popular commercial telescopes. Most telescopes that TheSky controls are serial devices (one exception is Vixen SX mounts; it uses an Ethernet connection). For a telescope that uses serial communications to “communicate” with the computer (and TheSky), the computer must have a serial port.
Unfortunately, serial ports have been replaced by USB ports on virtually every newer model computer. This means the physical USB hardware, as well as the USB protocol, is not compatible with older serial devices. Fortunately, there is a solution…
The most common method to connect a personal computer that has a USB port to a telescope that uses serial (RS232) communication, is to use purchase a USB to serial adaptor. This hardware device converts one of the computer’s USB ports into a virtual serial port that understands serial communication used by the telescope.
The most common way to do this is to use a USB to Serial Adaptor so that one of the computer's USB ports can accept RS232 commands. (Bluetooth or serial to Ethernet hardware devices are other, less common, and typically more expensive alternatives.)
USB to serial adaptors are relatively inexpensive and can be purchased on-line or most electronics stores.
· Before purchasing the USB to serial adaptor, make sure the adaptor is compatible with your computer’s operating system. USB adapters based on the FTDI chipset work well on macOS, Linux, and Windows, and do not require installation of a separate software driver.
· Carefully follow the manufacturer’s setup instructions for your operating system. Remember, the USB to serial adaptor hardware requires that you install a separate software driver before it can be used to communicate with a telescope.
When you plug a USB to serial adaptor into a Mac, a message that a new network device has been connected (via the Network options in System Preferences). Note that configuring the USB to serial adaptor as a network device will not allow TheSky to control a telescope that uses RS232 serial communication. For TheSky to control a telescope that uses serial communications on macOS, an OS X-compatible USB to serial adaptor driver must be installed first. Contact the manufacturer of your USB to Serial Adaptor hardware device or visit the manufacturer’s Downloads page to obtain this driver.
After installing the macOS-compatible USB to serial adaptor driver, you need to select it from TheSky’s Telescope > Telescope Setup > Settings window.
You’ll also need a telescope cable that connects your computer to USB to serial adaptor. Cables for Meade and Celestron products can be purchased from the Software Bisque Store.
TheSky must be configured so your computer can communicate with the telescope. The following general procedure applies to most “go to” telescopes.
1. Turn off the telescope.
2. Using the appropriate telescope cable, connect the serial port on the telescope to an unused serial port. If your computer does not have a serial port, you’ll need to use a USB to serial adaptor.
3. Turn on the telescope.
4. Select the Telescope Setup command from the Telescope menu to show the Imaging System Setup window.
Figure 170: The default Imaging System Setup window.
5. Highlight Mount from the Imaging System tree on the left.
6. From the Mount Setup drop down menu, click the Choose command to select your telescope model and click OK.
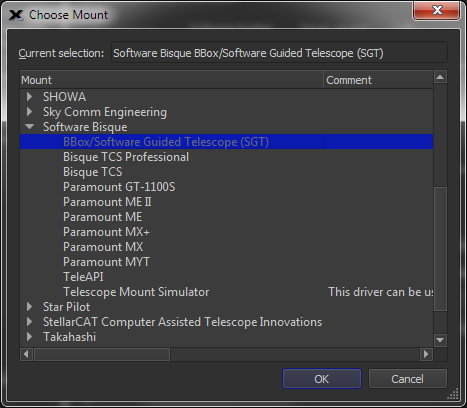
Figure 171: Select your mount from the list of supported telescopes.
7. From the Mount Setup drop down menu, click the Settings command. On macOS, the Serial Device Settings window allows you to specify the USB to serial adaptor that your telescope cable is connected to.
· Only standard serial ports or USB to serial adaptors that are not being used by any other device should be used.
· Use Windows Device Manager to determine the COM port number for your serial ports, or USB to serial adaptor.
Most “go to” drive systems must be properly configured before TheSky can control them. You can do this “by hand,” using the telescope’s hand paddle. Or, you can do it from within TheSky by performing a process called synchronization.
(Note that Celestron telescopes using firmware version 4.1 and earlier cannot be synchronized from TheSky and must be aligned using the hand paddle before TheSky can control it.)
· The local date, time, time zone, Daylight Saving Time and terrestrial coordinates must be manually input to the telescope’s hand paddle. If the telescope is connected to your computer, you might find it easier to use TheSky to initialize the telescope’s hand paddle with these values. If your telescope can be initialized by TheSky, click the Location, Date, Time command from the Tools pop-up menu on the Telescope window to do so (page 392).
· The telescope must be aligned with the celestial sphere. Follow the manufacturer’s instructions for aligning the telescope with the night sky.
See “Software Synchronization” on page 398 for details how to synchronize your mount with TheSky.
After choosing your telescope, the Imaging System Setup window displays mount and driver-specific information and allows you to specify your telescope preferences.
|
|
Telescope Limits are applied only when the Slew command (page 403) is issued by TheSky.
Telescope Slew limits are not applied when using TheSky’s Jog or Move commands and are not applied when using the telescope’s hand paddle to slew the telescope.
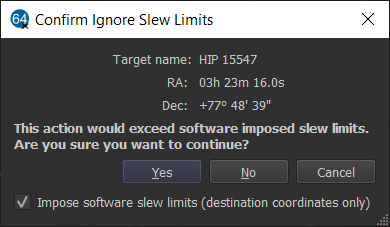
When the Telescope > Telescope Setup > Preferences > Impose Slew Limits (Destination Coordinates Only) checkbox is turned on (page 372), TheSky will show a warning message when the destination coordinates exceed the slew limit.
Figure 172: Confirmation is requried to slew into a telescope limit region. |
The Telescope > Telescope Limits command allows TheSky to attempt prevent telescope slews within a slew limit region.
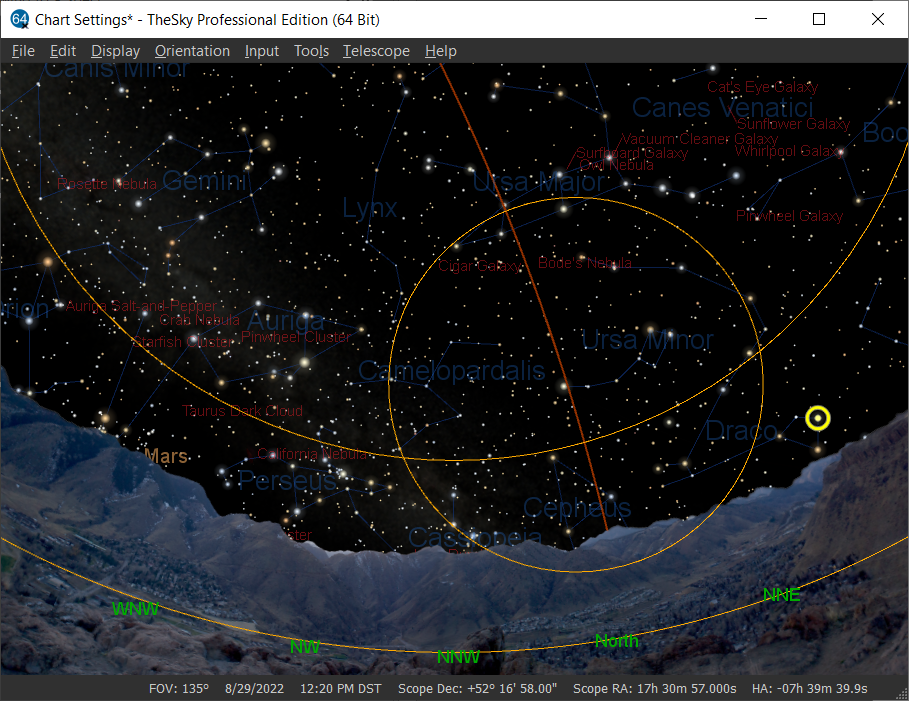
Figure 173: Yellow telescope limits lines: 0° lower altitude, 30° upper altitude, and 70° maximum declination.
Turn on this checkbox to show the upper and lower telescope limit lines on the Sky Chart.
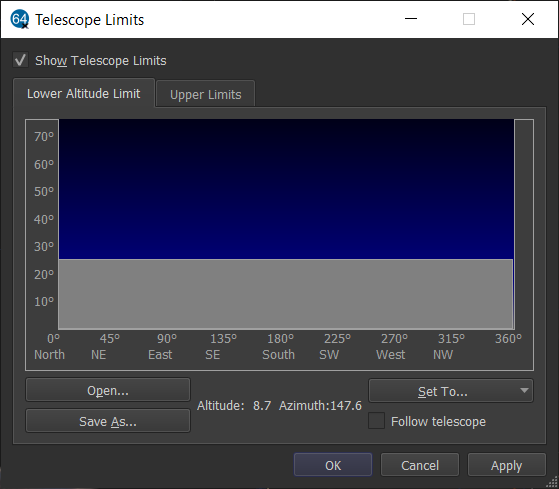
Figure 174: The Lower Altitude Limit tab on the Telescope Limits window.
Choose the Lower Altitude Limit tab to set minimum altitude limits for your telescope setup.
Similar to “Custom Drawn Horizons” (page 268), click and drag the mouse inside the blue-black rectangular region to draw the lower altitude limit from 0 to 360 degrees azimuth.
By default, the maximum altitude is about 75 degrees. Click and drag edges of the window to make it larger.
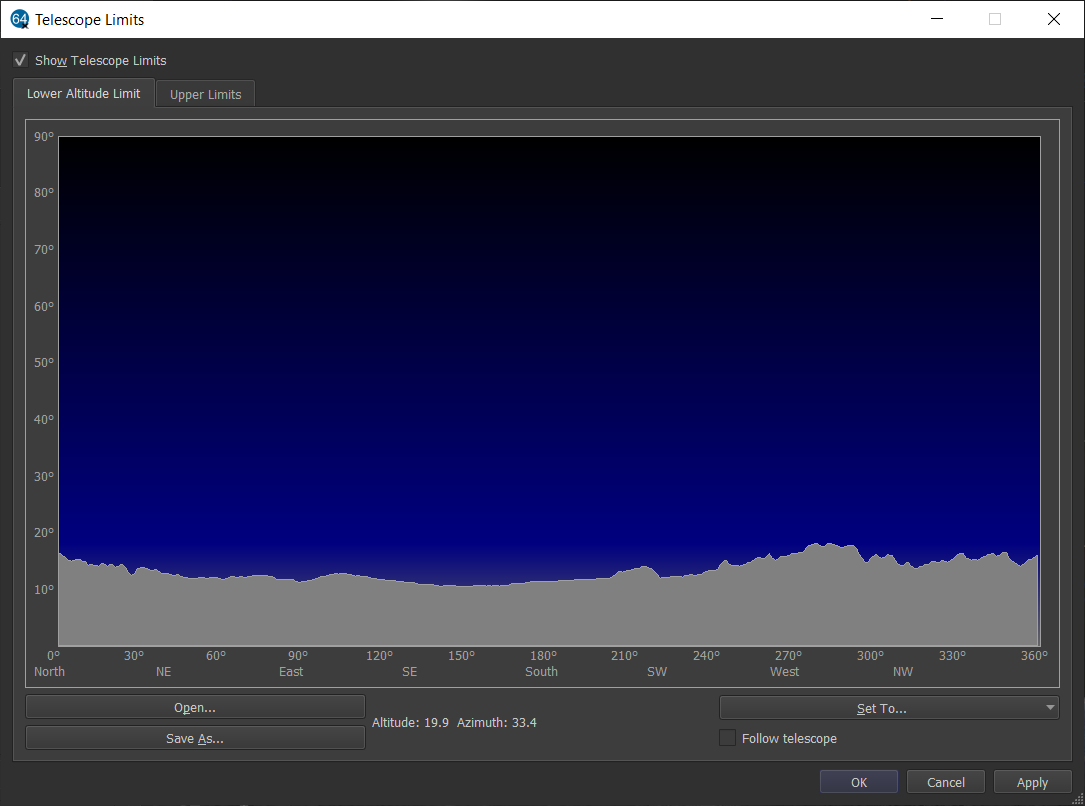
Figure 175: Enlarge the Telescope Limits window to show 90 degrees maximum altitude.
Click the Open button to select a formatted TheSky custom horizon file with the extension .hrz file. See “Custom Drawn Horizons” on page268 for details.
Click the Save As button to save the current lower altitude limit as a formatted TheSky custom horizon file text file. See “Custom Drawn Horizons” on page268 for details.
Click the Set To pop-up menu to create a pre-defined lower altitude limit line.
· Custom Drawn Horizon: Use the current custom drawn horizon for the lower altitude limit (see “Horizon and Atmosphere Settings”).
· Photographic Horizon: Use altitude of the currently selected panoramic photo as the limit line (see “Horizon and Atmosphere Settings”).
· 0-40 degrees: Draw a horizontal limit line at this altitude.
When the Follow Telescope checkbox is turned on and TheSky is connected to a mount, the altitude limit line is drawn based on the mount’s altitude and azimuth position. This lets you trace your local horizon using the telescope’s hand paddle to move the mount while looking through the eyepiece.
When you first open the Telescope Limits window, you will first be given an opportunity to set the Upper Limits of your telescope’s slewing control. Use the data fields to enter maximum values for declination and altitude slewing and to choose whether the telescope limits are plotted on the Sky Chart.
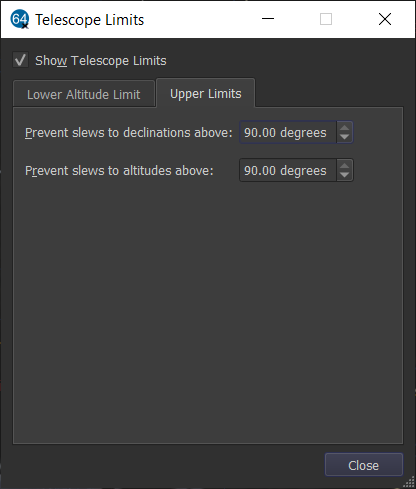
Figure 176: The Upper Limits tab of the Telescope Limits window.
Enter the maximum declination, in degrees, the telescope can slew to without issuing a warning. TheSky will issue a warning if the declination of the target is greater than this value.
Enter the maximum altitude, in degrees, the telescope can slew to without issuing a warning. TheSky will issue a warning if the altitude of the target is greater than this value.