
NASA’s moniker for a technique satellites use to determine their orientation is “lost in space”. To determine its orientation, the satellite acquires a photo of a star field, any star field, then matches the stars in the photo with the known positions of stars in astronomical databases. Once the photo’s location on the celestial sphere is known, the satellite’s orientation in space can also be determined.
All Sky Image Link applies a similar “lost in space” process to help initializing, calibrating, polar aligning, and precisely pointing (using the “Closed Loop Slew” feature, page 405) earth-based telescopes. Anyone who has ever tried to set up a telescope — especially one with a DSLR, video or CCD camera attached — knows that one of the most difficult tasks is finding or placing that very first star in the eyepiece or on the detector, so that the telescope’s control system can be aligned with this position.
Once an uninitialized telescope acquires a FITS photo, anywhere on the celestial sphere, All Sky Image Link can find the photo’s astrometric solution (a.k.a. “plate solve”). The astrometric solution is also saved to the FITS header using the World-Coordinate System (WCS) so that the equatorial coordinates of every pixel on the photo is known. This information can be used for the initial control system synchronization, or to calibrate the mount.
The optional TPoint module’s Automated Pointing Calibration feature (page 508) automates the process of choosing a target to photograph, slewing the telescope to the target, acquiring a photo, determining the astrometric solution, and adding this information to the pointing calibration data set.
· The Cameras+ Module and a supported camera to acquire FITS photos.
· An optical system that produces a minimum field of view of 10 arcminutes for the smaller dimension. See “Advanced Preferences” on page 232 to configure All Sky Image Link for large format photos, or photos with 3-degree fields of view and wider.
· All Sky Image Link can be configured to search a range of image scales if it is not known. Once the image scale is determined, subsequent All Image Sky Image Links are significantly faster.
All Sky Image Link operates performs similar functionality as Image Link (see “Image Link and Automated Astrometry” on page 322). Image Link requires an approximate or “best guess” image scale and the approximate equatorial coordinates of the photo so that it can search a small region of the sky to locate a pattern match between the stars in the photo and the actual stars. All Sky Image Link searches the entire celestial sphere to match the star patterns in your photo.
To perform an All Sky Image Link, the 1.8 GB “All Sky Image Link Database” named 10-180.allsky must be present on the computer. This database contains millions of known star patterns for fields of view between 10 and 180 arcminutes.
Due to its large size, the All Sky Image Link Database is distributed as a separate download. The procedure below describes how to download and save this file to your computer.
1. Click the Image Link command from the Tools menu.
2. On the All Sky tab, click the Download the All Sky Image Link Database link at the top of the window to download and save the All Sky Image Link Database archive, named 10-180.zip. Note that you must join and log into the Software Bisque web page to access this resource. Download access is otherwise denied.
3. Unzip or extract the file named 10-180.allsky from 10-180.zip and save it to the Astrometry folder in the “Application Support Files” folder (see page 28 for details about the location of this folder on your operating system).
Once the All Sky Image Link Database has been copied to your computer, you are ready to perform an All Sky Image Link.
1. Choose the Image Link command from the Tools menu.
2. Click the Open FITS button on the All Sky tab of the Image Link window.
3. Navigate to the folder on your computer where the photo resides, highlight it, and then click the Open button.
4. Configure the All Sky Image Link options described below and click the Find All Sky Image Link.
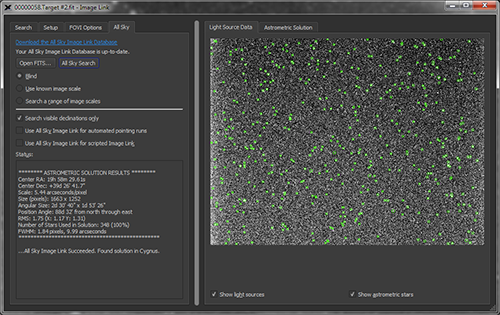
Figure 158: Successful All Sky Image Link using a photo with a limited star field.
When visible, click this link to open a browser on the All Sky Image Link Database download page.
The URL to this page is: http://www.bisque.com/allskydownload. You must be signed in to the Software Bisque web page, and have a registered TheSky Professional serial number with an active subscription to access this resource.
Click this button to open the FITS photo on which to perform an All Sky Image Link.
Click this button to begin searching the entire celestial sphere (or, the visible declinations, when the Search Visible Declinations Only checkbox is turned on) for an Image Link. Depending on the size of the photo, and the search parameters below, the search time can be from a few seconds to a minute or more. The button text changes to Abort so that the process can be stopped if needed.
Turn this option on if you do not know the image scale, in arcseconds per pixel, for the photo.
When the Blind option is selected, enter the range of image scales to use during the all sky image link search. All Sky Image Link starts with the lower image scale, performs an all sky search, and when no match is found, increments the image scale and continues this process, up to the maximum image scale, or until a match is found.
The above process can be very time consuming, so please be patient. Once the image scale has been found for optical configuration, use the Known Image Scale option to speed searches.
|
|
Blind All Sky Image Link and Image Cropping
To speed All Sky Image Link searches, by default, CCD/CMOS photos that are wider or taller than 2500 pixels are cropped to 25 percent of their original size.
Using the default settings with a large CMOS sensor that has relatively small pixels may cause blind All Sky Image Links to fail because the field of view of the cropped photo is too small.
In this case, edit the Blind All Sky Image Link options by clicking TheSkyX Pro > Edit menu (Linux and Windows or TheSkyX menu on macOS) Preferences > Advanced > All Sky Image Link Crop Settings (applies to “Blind” option only) and increase the size of the cropped photo. |
Use this option when you know the image scale of the photo to minimize the time it takes to find an All Sky Image Link.
Enter the image scale for the photo, in arcseconds per pixel.
For best results, the image scale of the photo should be accurate to within a few hundredths of its actual value. In practice, determining image scale this accurately without Image Link can be difficult. Setting a larger Image Scale Tolerance, specified as a percentage of the photo’s image scale, can help find the astrometric solution when only the approximate image scale is known.
If you’re unsure of your imaging system’s image scale, use this option to specify a range of image scales to search to find the Image Link.
Enter the Minimum and Maximum image scales, in arcseconds per pixel, to search.
Choose the appropriate option for your telescope. The time required to find a matching star patterns in photos with the patterns of cataloged stars can be greatly reduced if you know whether the photos generated by your optical system are mirrored.
Choose this option if photos produced by your optical system (telescope, camera, focal reducer, etc.) are not mirrored.
Choose this option if photos produced by your optical system (telescope, camera, focal reducer, etc.) are mirrored.
Choose this option if you are unsure or do not know the details of the optical system that was used to produce the photo.
When this checkbox is turned on, All Sky Image Link determines the lowest visible declination based on TheSky’s current latitude settings (page 36), and then only searches at or above this declination to speed up all sky searches.
Turn this checkbox on to use All Sky Image Link instead of Image Link during automated pointing calibration runs. This can be use helpful for portable setups, before the polar alignment is
This text box provides status of the search and reports the astrometric solution results when successful (see Figure 158).
Turn this checkbox on to show the inventory of stars and other light sources on the photo after the Find All Sky Image Link button is clicked. Light sources are shown as green circles.
Turn this checkbox on to show purple circles that represent the known cataloged stars used in the astrometric solution.
